Drag and drop module and field ordering
- Dorian Port
The new console allows users to re-order the modules and fields using a new drag and drop interface. This is supported in the following areas:
- Map Settings->Module Settings: Used to change the order of modules in the application
- Map Settings-> (Module): After selecting Map Settings, selecting the name of a module will display its fields. The order / groupings can be changed using the new interface
Changing the order of modules
To change the order of modules:
- Select Map Settings->Module Settings to display a list of configured modules
- Select the "Change order" button
- A list of modules is displayed, in the order that they are currently configured
- To move a module, select, click and hold the mouse button. Drag up/down in the list to reposition the module. Release the mouse button to drop the module in the current place.
- When complete, select "Submit order changes" button and your changes are saved
Changing the order and grouping of fields
To change the order in which fields are displayed:
- Select Map Settings and choose a module in the left hand menu tree
- A list of configured fields are displayed, select "Change order" button. Note: Do not select the small down arrow in the right side of the button, click on the text itself.
- A list of fields and the split between groups is listed
- To move a field, select, click and hold the mouse button. Drag up/down in the list to reposition the field. Release the mouse button to drop the field in the current place.
- When complete, select "Submit order changes" button and your changes are saved
Field mapping groups
When changing the order of fields in the list, they can be freely moved from group to group before releasing.
Changing field groups
In "Changing the order and grouping of fields" above, we explained how to display a list of fields and reorder. In step 3 above, a list of fields is displayed, similar to the following:
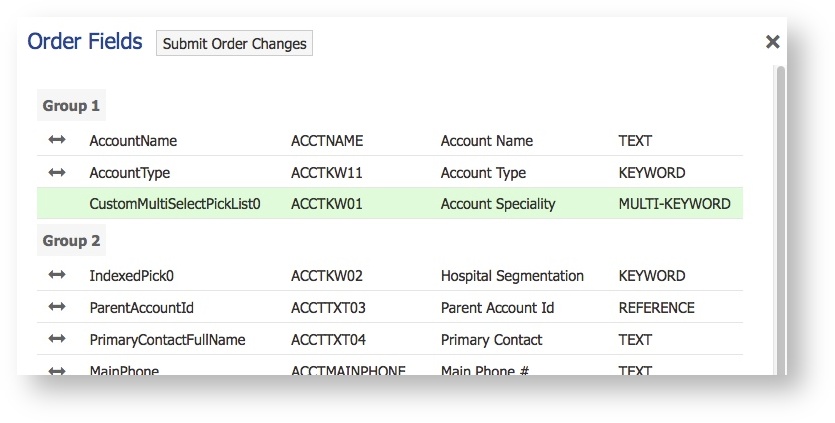
The display above shows seven fields split into two groups. When re-ordering fields, administrators are free to drag and drop between groups. If all fields are dragged from one group to another, the empty group will be removed.
Creating new groups is done using the double-headed horizontal arrow. Tapping on the icon sets the field to the right as the last field in the current group and moves all remaining fields to a new group. In the example above, tapping on the "Separate here" icon to the left of the "ParentAccountId" field defines "ParentAccountId" as the last field in group 2. Group 3 will be created and "PrimaryContactFullName" becomes the first field in group 3:

Selecting "Submit Order Changes" confirms that this is the grouping you wish to create.
Changing the order of groups
As well as splitting fields into separate groups, you can also re-order these groups in the console. For example, you could move all fields in "Group 3" above "Group 2" fields, quickly and without having to move individual fields.
To change the order of groups, select the down arrow within the "Change order" button and choose "Group":

A list of groups is displayed, reorder by using drag and drop to reorder the list. Selecting "Submit order changes" to confirm the change.