Connector Settings
- Evangeline Cruz (Unlicensed)
After activating Lotus Notes Connector, you can open the connector setting by clicking the Tools at the top-right of the Connector box.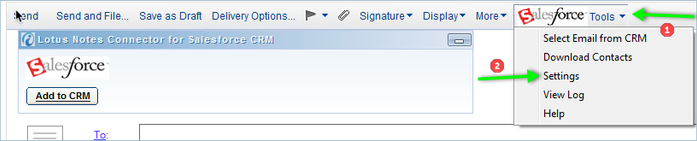
![]() Click on your specific CRM to see details and screenshots for guidance.
Click on your specific CRM to see details and screenshots for guidance.
Connection
Here you can enter / select the information / options to connect to your CRM.
Security Token
The Security Token is not required if you sign in from a trusted Network. Please contact your CRM Administrator if you require a token.
Proxy settings
If you are using a proxy to connect to internet, you can enter the proxy connection details here.
(You will be able to get your proxy connection details from your browser settings or IT Administrator)
Sync
Here you can enable or disable the scheduled Calendar / Task sync between the Notes mail and CRM.
(You must have agent execution rights in the server to run the sync agent in server. If you don't have rights, contact your Notes/Domino Administrator to enable the Server based sync agent.
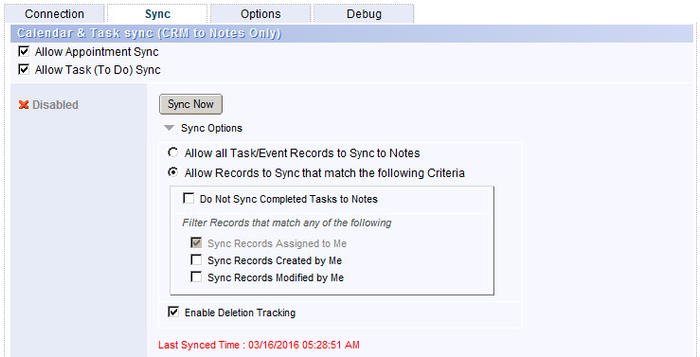
You can click the "Sync Now" button to sync the items immediately and does not require agent execution rights.
Sync Options allows you to filter records from CRM that match a criteria.
Added more sync options in Settings menu so the user can filter which data is synced to Notes from CRM.
See the Connector Features - Calendar /Task Sync section for more information
Options
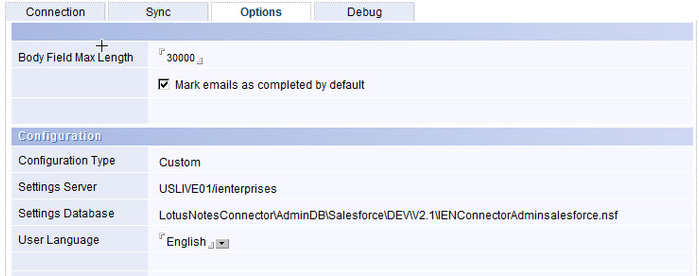
Mark Emails and appointments as completed by default
Enabling this feature will set the "Mark Completed" option in the Mail Form to be "on" by default. All emails synced to CRM will be marked as completed in CRM.
Connection
Here you can enter / select the information / options to connect to your CRM.
* Please note some settings are only available in Version 5.1 + of the Connector. Click on Check Updates button to download the latest version.
Proxy settings
If you are using a proxy to connect to internet, you can enter the proxy connection details here.
(You will be able to get your proxy connection details from your browser settings or IT Administrator)
Sync
Calendar and Tasks
Here you can enable or disable the scheduled Calendar / Task sync between the Notes mail and CRM.
(You must have agent execution rights in the server to run the sync agent in server. If you don't have rights, contact your Notes/Domino Administrator to enable the Server based sync agent.
You can click the "Sync Now" button to sync the items immediately and does not require agent execution rights.
Note. The following sync options are only available in LNC for MSCRM V5.1
Added more sync options in Settings menu so the user can filter which data is synced to Notes from CRM.
See the Connector Features - Calendar /Task Sync section for more information ![]()
Options
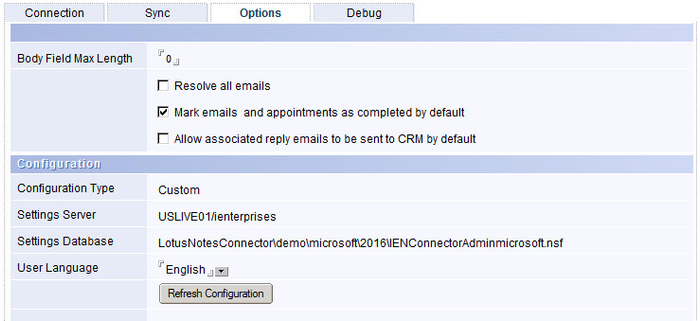
Resolve all emails
In the MSCRM, messages can be linked to multiple Contact records. 'Resolve Emails' is our Notes based way to help with that.
Example:
An email comes in to Notes with one "To" and 5 "CC" names.
You use the Lotus Notes Connector to associate the message in Notes to a CRM contact (the To field).
The "Resolve all Emails" feature will look at the CC names, and check your CRM for any matching records based on email address. Lets say 4 of the 5 are also in your CRM.
When you open the CRM and look at the Contact record to whom you associated the original message, you will see the message and 4 of the 5 names will no longer appear as email addresses, but as 'name links' to the matching 4 other contact records in the CRM - click on the name link and you are taken to the CRM record for that person.
Mark Emails and appointments as completed by default
Enabling this feature will set the "Mark Completed" option in the Mail Form to be "on" by default. All emails synced to CRM will be marked as completed in CRM.
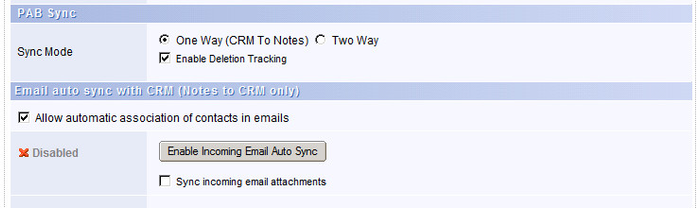
Allow automatic association of contacts in emails
Selecting this feature will enable the automatic association of an inbound email to a CRM contact when the Select button is clicked provided that the sender of the email exists in CRM contacts with the same email address.
Connection settings
Here you can enter / select the information / options to connect to your CRM.
Mark emails as completed by default
Enabling this feature will set the "Mark Completed" option in the Mail Form to be "on" by default. All emails synched to CRM will be marked as completed in CRM.
Allow automatic association of contacts in emails
Selecting this feature will enable the automatic association of an inbound email to a CRM contact when the Select button is clicked if the sender of the email exists in CRM contacts with the same sending email address. You will be prompted to choose if duplicate contact email addresses exist.
Proxy settings (Windows Only)
If you are using a proxy to connect to internet, you can enter the proxy connection details here.
(You will be able to get your proxy connection details from your browser settings or IT Administrator)
Sync Calendar and Tasks
Here you can enable or disable the scheduled Calendar / Task sync between the Notes mail and CRM.
(You must have agent execution rights in the server to run the sync agent in server. If you don't have rights, contact your Notes/Domino Administrator to enable the Server based sync agent.
You can click the "Sync Now" button to sync the items immediately and does not require agent execution rights.
Check for Updates
Click on the Check for Updates button to download the latest LNC installer.
Debug mode
This is for use by iEnterprises support to debug any problems with the connector.
Use CDATA
This can be enabled if there are issues when copying accented characters to CRM. Note, this can cause formatting issues when using a MAC.
Body Field MAX Length
Controls the amount of characters that can be copied to CRM for Emails. CRM Limit is 16000KB.
Replace Accents
Special Characters, Double-bit characters and other special characters may be configured by enabling Replace Accents.
Type new characters at the bottom of the list and click OK. The Connector will replace the character in the left hand column with the corresponding character in the right hand column.