Lotus Notes Connector Manual Installation Instructions
- John Carini (Unlicensed)
- Evangeline Cruz (Unlicensed)
If you have chosen to manually update the Mail Template with the design elements see the instructions below.
Step | Action |
1 | Open the Mail Installer and the Mail database to be modified in the Designer Client. |
2 | Copy these designs from the Mail Installer and paste it into the Mail Template being modified : form - (IENContactSugar) form - IENWebServiceProfile form - IENVersion form - (IENContactDownload) form - (IENCharacterSkip) form - (IENSettings_Mail) script library - ienWebService script library - ienWebService_CRM script library - ienWebService_sync script library - IENConfiguration script library - ienCommon script library - ienCustomCodes subform - IENContactsSearch subform - IENSubform subform - IENSubform_Microsoft subform - IENWebService subform - IENSelection subform - IENSubform_activation agent - SyncCRMRecords agent - -> Lotus Notes Connector\Reset Sync view - (IENView) view - (IENCalendarFieldsLookUp) view - (IENDocumentLookup) imageresource - BTN.gif imageresource - Button-Back.gif imageresource - Connector_Generic.gif imageresource - Connector_Microsoft.gif imageresource - IENConnectorLogo.gif Personal Address book Integration : Copy these designs from the Mail Installer and paste it into the Personal Address Book database : agent - -> Lotus Notes Connector\Download Contacts from CRM agent - -> Lotus Notes Connector\Open Contact from CRM agent - -> Lotus Notes Connector\Send Contact to CRM agent - -> Lotus Notes Connector\Settings agent - -> Lotus Notes Connector\Sync All Contacts agent - -> Lotus Notes Connector\Sync Selected Contacts form - IENSettings subform : IENWebservice_NAB script library - ienJavaSOAPRequest_NAB script library - ienWebservice_crm_NAB script library - ienwebservice_sync_NAB script library - ienCommon_NAB script library - ienCustomCodes_NAB script library - iencontacts_NAB view - CRM Contacts imageresource - IENConnector.gif |
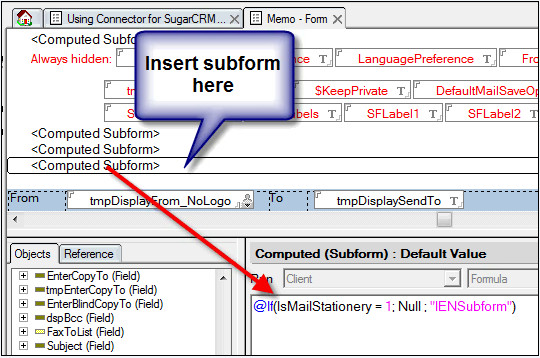
3 | Open the Memo** form from the Mail file and insert a computed subform (see the screen shot below) Make sure the formula in the Programmer's Pane is computed and the formula reads : @If(IsMailStationery = 1; Null ; "IENSubform") REPEAT the same for forms - Reply and Reply with history ** If you are using Mail version 8.0 or higher, the form name is "Message"
=> Repeat this step for the Reply, and Reply with History forms. |
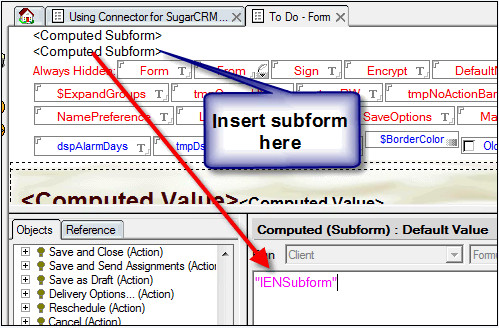
4 | Open the To-Do form from the Mail file and insert a computed subform into the To-Do (see the screen shot below) Make sure the formula in the Programmer's Pane is entered: "IENSubform"
|
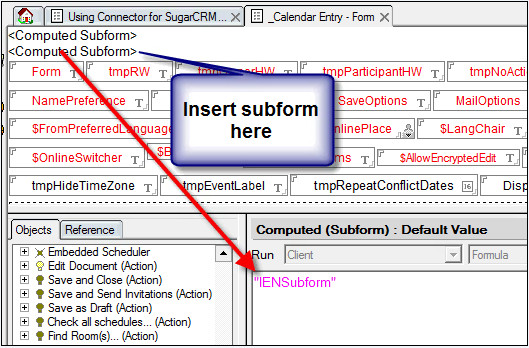
5 | Open the _Calendar Entry form from the Mail file and insert a computed subform into the _Calendar Entry (see the screen shot below) Make sure the formula in the Programmer's Pane is entered: "IENSubform"
|
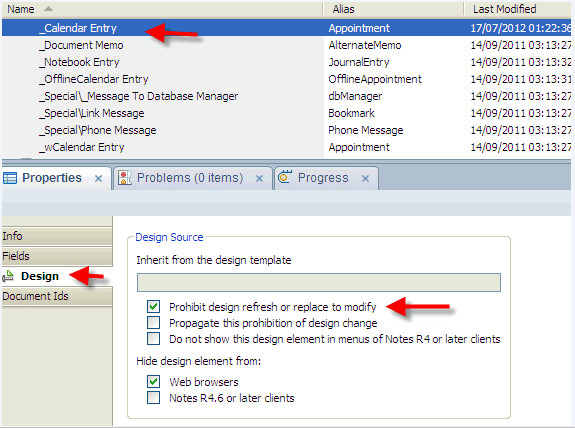
Important If you have chosen to manually update the Mail file rather than the Mail template, you should make sure all the design elements listed above have the property 'Prohibit design refresh or replace to modify' checked. If you haven't checked this flag, when the Server does a mail refresh or if refresh is done manually, all the design elements of the Mail file will be replaced with the ones from the Mail template. If the Mail template doesn't have the Connector installed, all manual changes done on the Mail file will be lost. Choose design element - > Right click and choose properties - > Select Design Tab and check the property as shown below
|