There are 2 ways to get the
Social Insights for G Suite, from the
Settings > Add-on of your
Google mail or from the
G Suite Marketplace.
From
GSuiteG Suite Marketplace
1. Follow this link :
for iEnterprise CRM >>> https://gsuite.google.com/marketplace/app/
ienterprisecrmgmail/5951987243522. On the product page, click Install button
3. Permission "Get Ready to Install" dialog box opens, click Continue.
4. Google Sign-in dialog box opens, select an Email Account you want to add the connector to.
5. The Account Access Permission dialog box opens, click Allow.
6. Installation success dialog box opens, click Done.
7. Go to the Email Account you selected and reload/refresh.
8. The Email Connector for Gmail and CRM Social Insights for G Suite icon is added:
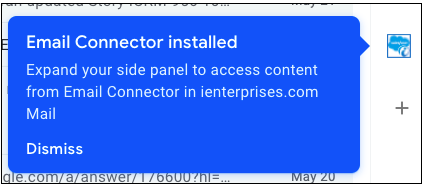
You are now ready to see information about your contact info from your mailbox and add emails to your CRM!contacts from social media and other business pages.
On your Mailbox
1. Open Settings, select Add-ons tab OR click the "+" icon on the sidebar
2. Click Get Add-ons.
3. G Suite Marketplace dialog box opens, enter "iEnterprises" on the search bar.
OR, click this link https://gsuite.google.com/u/0/marketplace/search/ienterprises
4. Select the app for your specific CRM (like this for Salesforce) > 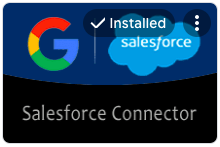 app >
app > 
5. On the product page, click Install button.
6. Permission "Get Ready to Install" dialog box opens, click Continue.
7. Google Sign-in dialog box opens, select an Email Account you want to add the connector to.
8. Account Access Permission dialog box opens, click Allow.
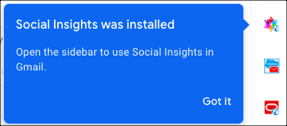
9. Installation success dialog box opens, click Done.
10. Go to the Email Account you selected and reload/refresh.
11. The Email Connector for your <CRM> The Social Insights for G Suite icon icon is added **.
You are now ready to see information about your contact info from your mailbox and add emails and calendar items to your CRM!
** Reference CRM icons:
 - iEnterprise CRM
 - Salesforce
 - MS Dynamics 365
 - Sugar CRMcontacts from social media and other business pages.
Related Pages
| Filter by label (Content by label) | ||||||||||||||||
|---|---|---|---|---|---|---|---|---|---|---|---|---|---|---|---|---|
|
Search this Product
| Live Search | ||||||||
|---|---|---|---|---|---|---|---|---|
|